
This is the home page for documentation, tutorials, and sample data for "Revision F" ("REV_F") of the PVOS CO2 Monitoring Kit.
The primary repository for hardware and firmware designs is on github here. Below you'll find a tutorial that includes an overview of the monitoring hardware; a guide to setting up the firmware; and a guide to getting data online.
 |
|---|
| Rev F of the PVOS CO2 Monitor. |
Hardware design files are "Free and Open Source", available on github.
You can order a PCB by submitting the KiCad board file to OSHPARK (link to file already shared on OSHPark here), the gerbers to JLCPB (quick link to order already set up [here]) -- this usually takes about a week or two, depending on shipping method. You can also order them from from PVOS.org -- we have batches already manufactured, and we can typically ship them within a day or two.
 |
|---|
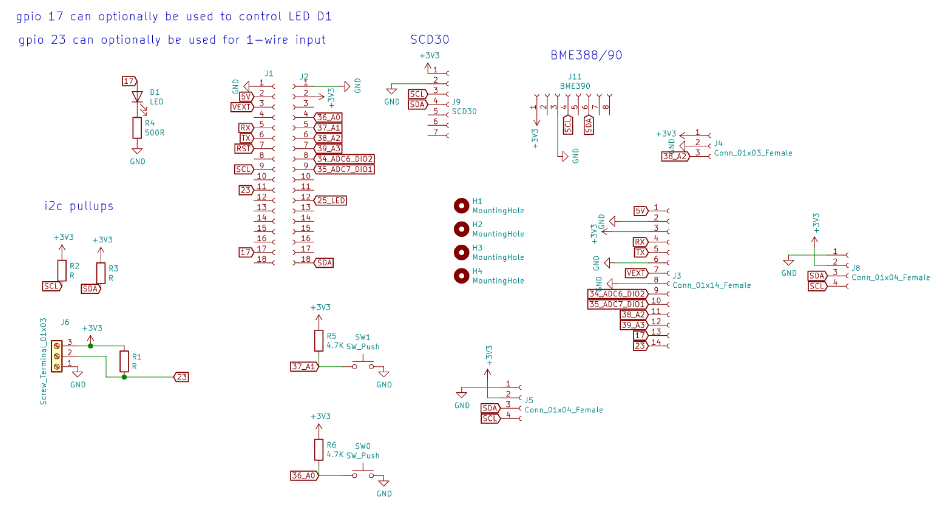
| Rev F PVOS CO2 Monitor schematic (generated in KiCAD). PDF version is here. |
 |
|---|
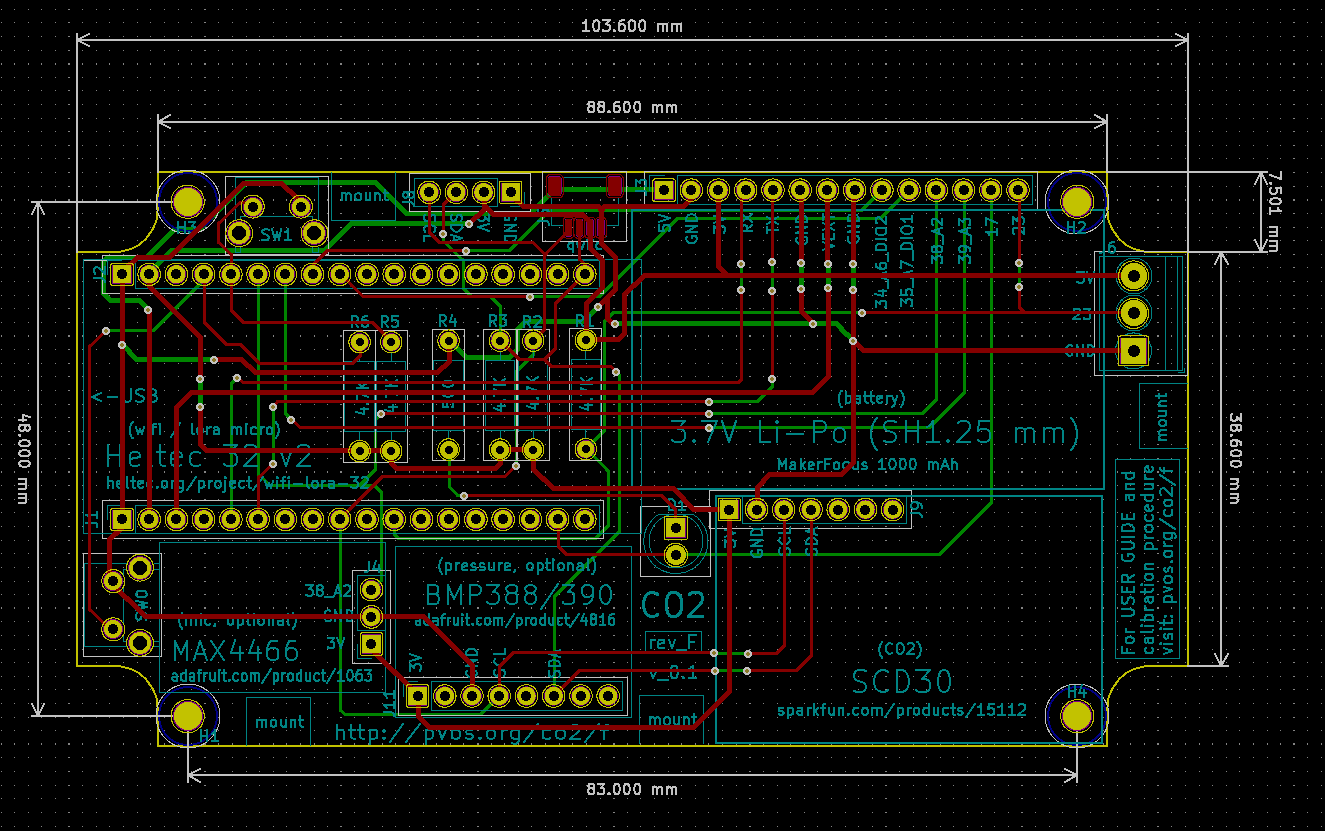
| Rev F PVOS CO2 Monitor board layout (generated in KiCAD). |
 |
|---|
| Rev F PVOS CO2 Monitor rendered by JLCPB. You can order 5 boards for them via this link. |
Video tutorial covering how to set up the firmware is here:
You can also use the below guide:
The following firmware is based on version 1.8.13 or greater of the Arduino IDE. Earlier versions may work, but are currently untested. Download the latest version here.
The current firmware (v0.1-alpha) can be downloaded here as a zip file. Extract the contents, and copy the entire folder named 'pvos_co2' (containing a file 'pvos_co2.ino', and a folder called 'data') into your Arduino Sketch folder.
First, you should add support in the Arduino IDE for the Heltec.
There are very clear instructions here.
Quick notes as reference:
You'll be adding the following JSON to the “Additional Board Manager URLs” field in File > Preferences:
https://dl.espressif.com/dl/package_esp32_index.json
Then, under Tools > Board > Boards Manager, search for ESP32 and press install button for the “ESP32 by Espressif Systems“.
Finally, you can select the board under the Tools > Board menu as:
Heltec Wifi Lora 32(V2)
These can be installed via the Arduino IDE Library Manager:
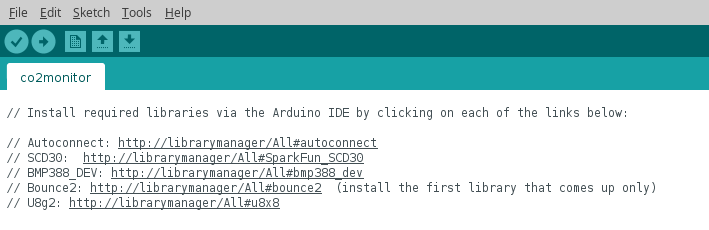
Alternatively, if you'd like to download the libraries manually via github and place them in the "libraries" folder of your Arduino sketch folder, you can do so via these links (to github repos for the libraries):
Install the ESP32 Filesystem Uploader following the instructions here.
Follow the same instructions to upload the 'data' folder to your Heltec via the ESP32. Note: before uploading, you must select the Heltec ESP32 Wifi LoRa (v2) board from the Tools > Boards menu, and the proper Port from the Tools > Port menu.
After uploading the firmware as above, you can follow the instructions in the below video to connect your monitor to your WiFi locally:
The following steps are for collecting data via Bayou-CO2. Guides for getting data to Adafruit.io, Thingspeak, and other platforms forthcoming!
Video tutorial for this section is here:
Or follow the instructions below.
Follow the instructions on Bayou-CO2 for setting up a new feed.
(Coming soon: video tutorial)
First, connect to the hotspot shown on the screen.
Configure the device on your local wifi, using your phone.
This is ideally done using a laptop (for easy copy-paste of credentials):
Press the side button to see the IP address to which your device is connected.
Navigate to this address on your laptop.
Enter in the public key and private key for your Bayou-CO2 feed.
Navigate to http://data.pvos.org/co2/data/[ your public key] to see if data is flowing!